Setting the correct tracking force is one of the most important parts of a turntable setup. Your tonearm’s counterweight may have a tracking-force scale, but that scale is not always precise enough to tell you exactly how much pressure the stylus is putting on the record.
A stylus tracking force gauge gives you a much more direct way to check the actual vertical tracking force (VTF). This is especially useful when installing a new cartridge, changing cartridges, adjusting a tonearm, or simply checking whether your current setup is still correctly calibrated.
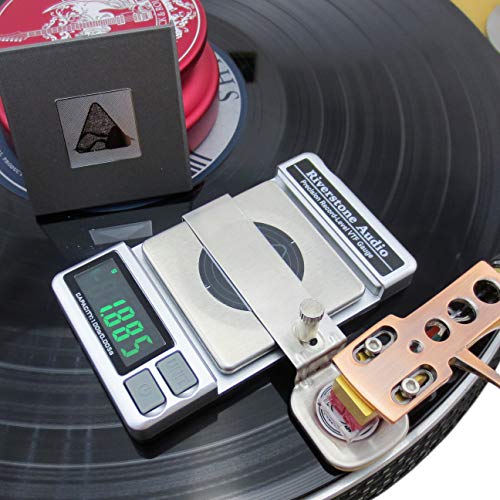
For most vinyl listeners, a small digital gauge with 0.01g resolution is more than enough. If you want measurement at approximately record height, a purpose-built record-level gauge such as the Riverstone Audio VTF Gauge is particularly interesting.
In this guide, I’ll look at some of the best stylus tracking force gauges for turntables, including digital and mechanical options, and explain what to look for before buying one.
What Is a Stylus Tracking Force Gauge?
A stylus tracking force gauge measures the downward force applied by the cartridge’s stylus to the record.
This measurement is normally given in grams. For example, a cartridge might have a recommended tracking force of 1.8g, meaning you should adjust the tonearm so the stylus applies approximately 1.8 grams of force while playing a record.
The correct value comes from the cartridge manufacturer. There isn’t one universal tracking force that works for every cartridge.
Too little tracking force can allow the stylus to lose proper contact with the groove, potentially causing mistracking, distortion, or skipping. Too much force can place unnecessary stress on the stylus and cartridge suspension and may contribute to premature wear.
A gauge gives you a way to check the actual measurement instead of relying entirely on the markings around the tonearm counterweight.
Quick Picks: Best Stylus Tracking Force Gauges
Why Use a Stylus Tracking Force Gauge?
Most turntables already have a tracking-force scale built into the tonearm. So why spend money on another tool?
The main reason is simple: the number on the counterweight is a setting, not a direct measurement of the force at the stylus.
Manufacturing tolerances, tonearm balance, cartridge weight, counterweight position and the geometry of the setup can all affect the final result.
A tracking force gauge lets you measure that force directly.
It’s particularly useful after installing a cartridge. You can balance the tonearm, set the counterweight according to the manufacturer’s instructions, and then place the stylus on the gauge to see what the actual reading is.
It’s also handy when you want to change cartridges regularly. Instead of trusting the tonearm scale every time, you can use the same gauge to verify the setting.
Digital vs Mechanical Stylus Tracking Force Gauges
The biggest decision is whether you want digital or mechanical.
A digital stylus tracking force gauge is generally easier to read. You lower the stylus onto the measuring platform and get a numerical value such as 1.80g or 2.00g.
That’s particularly useful when you’re trying to dial in a cartridge to a specific manufacturer’s recommendation.
Mechanical gauges are simpler. They don’t need batteries and there is less electronics to worry about. The downside is that reading the balance can take a little more care, and the resolution is usually lower.
For example, the Shure SFG-2 uses 0.05g increments, while the Pro-Ject Measure it DS specifies 0.01g precision.
For most modern turntable setups, I’d lean toward a digital gauge.
Does 0.001g vs 0.01g Really Matter?
This is where specifications can become a little misleading.
You will see inexpensive digital scales advertising extremely high resolution, sometimes down to 0.001g. That doesn’t automatically mean the gauge is actually more accurate.
Resolution tells you how finely the display can show a measurement. Accuracy tells you how close that measurement is to the actual force.
Repeatability matters too. If you measure the same tracking force several times, does the gauge give you roughly the same result each time?
For a typical home turntable, 0.01g resolution is already plenty for setting cartridge tracking force. A well-designed gauge that consistently measures at 0.01g can be more useful than an inexpensive scale claiming 0.001g resolution without meaningful accuracy specifications.
Why Record-Level Measurement Matters
This is one of the more interesting details when comparing tracking force gauges.
Imagine your record surface is approximately 2–3mm above the platter. That’s where the stylus normally operates.
Now imagine placing the stylus on a gauge whose measuring surface is 8–10mm above the platter.
The tonearm is now sitting at a different angle from its normal playing position.
The difference isn’t necessarily huge on every tonearm, but if you’re trying to make a precise measurement, measuring close to the actual record-playing height is a sensible approach.
That’s the reason Riverstone specifically designed its Record-Level VTF Gauge to measure approximately 2–3mm above the platter or mat.
For many casual setups, a standard low-profile digital gauge will still work perfectly well. If you’re chasing precise cartridge setup, record-level measurement is a feature worth considering.
How to Use a Stylus Tracking Force Gauge
Using a stylus tracking force gauge is fairly straightforward, but the stylus is extremely delicate, so take your time.
First, check the cartridge manufacturer’s recommended tracking-force range. Don’t simply copy the setting from another cartridge.
Next, balance the tonearm according to your turntable manufacturer’s instructions. On many tonearms, this means setting the counterweight so the tonearm floats and then setting the tracking-force scale to zero.
Place the gauge on a stable, level surface. If you’re using a digital gauge, turn it on and zero or calibrate it according to the manufacturer’s instructions.
With the stylus guard removed only when you’re ready to measure, gently lower the stylus onto the gauge’s measurement platform.
Read the measurement and adjust the tonearm counterweight in small increments until the reading matches the cartridge manufacturer’s recommended tracking force.
Once you’ve finished, restore the anti-skating setting according to your tonearm or cartridge manufacturer’s instructions. The Shure SFG-2 manual, for example, specifically calls for anti-skating to be temporarily set to zero during measurement and restored afterward.
Setting the correct tracking force is only one part of cartridge setup. The cartridge also needs to be positioned correctly in the headshell so the stylus tracks the record groove properly.
A cartridge alignment protractor can help you check the cartridge’s overhang and alignment angle. For a complete setup, use a tracking force gauge to set the stylus pressure, then use a suitable alignment protractor to check the cartridge position.
How Often Should You Check Tonearm Alignment?
You don’t need to measure tracking force every time you play a record.
It’s a good idea to check it when you install a new cartridge, reinstall a cartridge, change the tonearm setup, or notice unusual tracking problems. This is also a good time to check your cartridge alignment, since even a correctly set tracking force won’t compensate for a cartridge that isn’t properly aligned.
If you’re upgrading your cartridge, our guides to the best Audio-Technica phono cartridges and best Pro-Ject turntable cartridges can help you compare options before setting up your new cartridge.
You can also check the tracking force periodically to make sure the setup hasn’t changed. If you’ve adjusted the cartridge position, tonearm height, or other parts of the setup, it’s worth checking both the tracking force and cartridge alignment again.
A tracking force gauge is especially useful if you have multiple cartridges or regularly experiment with different turntable setups. For a new cartridge installation, checking the cartridge alignment and tracking force together gives you a better starting point for accurate playback.
What About Anti-Skating?
Tracking force and anti-skating are separate settings.
Tracking force controls the downward force applied through the stylus. Anti-skating applies a force intended to counter the tendency of the tonearm to move inward while playing a record.
Setting one doesn’t automatically set the other.
Once you’ve confirmed the tracking force, set anti-skating according to the instructions for your particular tonearm and cartridge. Don’t use a tracking-force gauge as a substitute for an anti-skating setup procedure.
Can a Tracking Force Gauge Damage the Stylus?
It can if you’re careless.
The most important thing is to lower the stylus gently onto the measuring surface. Don’t drop the tonearm onto the gauge.
Keep the stylus guard on until you’re ready to take the measurement, then remove it carefully.
You should also make sure the gauge is positioned securely. You don’t want it sliding around while the stylus is sitting on it.
A small amount of care goes a long way here. A tracking force gauge is supposed to make cartridge setup safer and more precise, not become another source of accidents.
What Should You Look For When Buying One?
When choosing a stylus tracking force gauge, I’d pay attention to five things.
Accuracy and repeatability should come before the number printed on the box. A gauge that consistently produces reliable readings is more useful than one with an impressive resolution figure but vague accuracy specifications.
Resolution of 0.01g is a good target for most home setups. You don’t need to spend a fortune chasing extremely small increments.
Measurement height is worth checking if you’re serious about cartridge setup. A record-level gauge measures closer to the height at which your stylus actually plays.
Non-magnetic construction is another useful feature, especially if you’re using moving-coil cartridges or other cartridge designs that could interact with magnetic materials. Pro-Ject specifically highlights its non-magnetic scale surface, while Riverstone uses non-magnetic materials around its record-level measuring system.
Finally, look for calibration support. A supplied calibration weight gives you a simple way to check whether the gauge is still reading correctly.
Do You Really Need a Tracking Force Gauge?
If your turntable came with a cartridge already installed and you never plan to change anything, you can probably live without one.
For anyone who changes cartridges, replaces styli, adjusts tonearms or wants to verify the factory tracking-force scale, a gauge is a very useful little tool.
It’s also one of those accessories that doesn’t need to be expensive. A basic digital gauge can give you the information you need without turning cartridge setup into a major project.
If you’re building a complete vinyl setup, a tracking force gauge also makes sense alongside other basic accessories. ShutterGroove’s guide to the top vinyl accessories for audiophiles includes a tracking force gauge alongside other useful turntable and record-care accessories.
Best Stylus Tracking Force Gauge: Which One Should You Buy?
For the most precise setup, the Riverstone Audio Record-Level VTF Gauge stands out because it measures tracking force close to the actual height of a playing record and specifies 0.005g resolution.
The Pro-Ject Measure it DS is a good choice if you prefer a branded digital gauge with a straightforward design, 0.01g precision and a non-magnetic measuring surface.
The standard Riverstone Audio Stylus Pressure Gauge makes sense if you want a small digital gauge without the record-level extension. Its 0.01g resolution and 200g capacity are more than enough for normal cartridge setup.
The Ortofon Stylus Pressure Gauge is worth considering if you want something inexpensive and completely mechanical.
The Shure SFG-2 remains an interesting option for collectors who like traditional mechanical Hi-Fi tools, though it’s an older product and availability is more limited.
For most vinyl listeners, I would focus less on chasing the smallest possible number on the display and more on getting a reliable, repeatable stylus tracking force gauge that makes cartridge setup easy.
And once your tracking force is properly set, don’t forget the rest of your record-care setup. Using a good anti-static inner sleeve for vinyl records helps protect the record itself, while 12-inch vinyl record outer sleeves protect the album jacket.
A good cartridge setup plus proper record storage goes a long way toward keeping your vinyl collection sounding good for years.
Disclaimer: Some links in this article are affiliate links. If you purchase a product through one of these links, I may earn a small commission at no additional cost to you. This helps support the site and allows me to continue creating photography and videography guides.